
The purpose of this Handbook is to provide the necessary guidance and details for conducting physical readiness testing for the Department of Military Affairs Security Officers to include both applicants and incumbents.
CONTENTS
- Test Day Procedures
- Testing Sequence
- Physical Readiness Test Standards
- Physical Readiness Test Procedures
- Physical Readiness Test Score Sheet
TEST DAY PROCEDURES
Prior to the start of the physical readiness test, the test administrator will speak with the participant to ensure the participant`s ability to complete the test without restrictions. If a participant declares they are unable to participate due to a restriction, the test will not be given.
Once all participates have verified their ability to participate, the Test Administrator will read aloud the following initial brief to all test participants:
Initial Briefing
Today, you will complete a battery of physical readiness tests. Each event measures the factors that underlie the ability to perform the essential and critical physical tasks required of you for the Department of Military Affairs Security Officer position. It is important that you give your best effort. Pace yourself. You will perform Push/Lift tests, Agility Run, Training Dummy Drag/Carry, Sit Ups, 300 Meter Run, Push Ups, and 1.5 Mile Walk/Run. If at any time you don’t feel well, please tell the test administrator.
Do you have any questions?
Physical Readiness Test
The test procedures are scripted to ensure consistency of test administration. All instructions are bolded and in “quotation marks.” Test Administrator will read the instructions and monitor safety of testing site. Test Administrator will keep time and call out “Start” and “Stop” for each test and annotate results on DMA Form 5.3-3-R, “Physical Readiness Test Results”.
TESTING SEQUENCE
The participant will complete the physical readiness test battery in the same order. A brief demonstration/summary of each test will be done by the test administrator immediately before the participant attempts each specific test.
Note: the locations and times listed below are intended to be minimum guidelines only and are not intended to dictate or to interfere with the locations resources for testing. If testing of large groups is required, for example, the size of the group will impact rest intervals. To ensure consistency, Applicant/Incumbents should be organized, by number, prior to testing and should complete the test events in the order so established, throughout the test session.
Sequence for Testing Events
| Location | Time | Event |
|---|---|---|
| Site of first test | 5min | Initial briefing. |
| Inside or Outside | 5min | Individual warm up. |
| Inside or Outside (Lift and Push Testing ) | 1min | Demonstration of push test and proper lifting technique. |
| Inside or Outside (Lift and Push Testing ) | 3min | Push 1st selected item x 3 repetitions (1 min each). Simulates pushing barriers. |
| Inside or Outside (Lift and Push Testing ) | 3min | Pull 2nd selected item x 3 repetitions (1 min each). Simulates pulling barriers. |
| Inside or Outside (Lift and Push Testing ) | 1-3min | Lift 3rd selected item x 3 repetitions (lift item). Simulates lifting barriers. |
| Inside or Outside | 2min | Demonstration the agility run with a walk through by test administrator. |
| Inside or Outside | 23.4sec | Agility run performed by participant. |
| Inside or Outside | 1min | Demonstration of proper drag or carry of 145# training mannequin by test administrator. |
| Inside or Outside | 1-3min | Drag or carry training mannequin 145# 25 feet by participant. |
| Inside or Outside | 5min | Rest and hydrate. |
| Inside or Outside | 1min | Demonstration of sit-ups by test administrator. |
| Inside or Outside | 2min | Sit-ups performed by participant (24 total). |
| Inside or Outside | 3min | Course directions for 300 meter run by test administrator. |
| Inside or Outside | 90sec | 300 meter run performed by participant. |
| Inside or Outside | 5min | Rest and hydrate. |
| Inside or Outside | 1min | Demonstration of push-ups by test administrator. |
| Inside or Outside | 5min | Push-ups performed by participant (18). |
| Inside or Outside | 5min | Rest and hydrate. |
| Inside or Outside | 3min | Course directions for 1.5 mile walk/run will be given by test administrator. |
| Inside or Outside | 20min | 1.5 mile walk/run performed by participant. |
| Inside or Outside | 5min | Individual stretch, hydrate and recover. |
| Inside or Outside | 5min | Wellness check and sign documentation. |
PHYSICAL READINESS TEST STANDARDS
The physical readiness test has valid evidence to support its use as a job-related requirement for selection, training, and retention of MASO positions. The standards represent the level of physical fitness which predicts safe and effective job performance of the essential physical tasks required of MASO. The standards are presented in the table below.
| Barrier (Push/Pull Lift) | Agility Run (sec) | Training Dummy (145lb) | Sit Ups (count) | 300 Meter Run (sec) | Push Ups (count) | 1.5 Mile Walk/Run (min:sec) |
|---|---|---|---|---|---|---|
| Three Operational items | 23.4sec | 25ft | 24 in 2 min | 90sec | 18 in 5 min | 20min |
PHYSICAL READINESS TEST PROCEDURES
Push / Pull Two Selected Item x 3 Repetitions
(Simulates pushing barriers)
The first event is a push/pull test, a measurement of the weight that can be moved by the force of your upper body and legs. It is important to use proper pushing techniques. Officer/Candidate will have to properly push on two selected items that can be found at their work location. The Officer/Candidate will push until the test administrator tells them to stop. One item will be pushed and a second item (or same) will be pulled separately for three one minute intervals for each item.
Please watch the pushing and pulling technique demonstrated by the test administrator for this event.
Event Demonstration
The test administrator will demonstrate proper pushing techniques.
Testing Administrator Tips
Allow a five minute warm up prior to the event. The starting position will have the participant has both hands on the first item, and then on the second item respectively for each test, upon which the command “Start” is given. The participant will apply force to the first item and continue applying force until the test administrator will say “Stop”. They will do this three times before moving to the second item using the same directions of applying force on the command of “Start” until the test administrator says “Stop”.
Equipment
Two items the employee will need to be able to push or pull as part of their job duties.
Lift One Selected Item x 3 Repetitions
(Simulates lifting barriers)
The second event is the lift test, a measure of the weight that can be moved by the force of your upper body and legs. It is important to use proper lifting techniques. Officer/Candidate will have to properly lift a selected item that can be found at their work location. This item will be lifted three times and placed back in its beginning position after each lift. The test will continue until the test administrator tells them to stop.
Please watch the lifting technique demonstrated by the test administrator for this event.
Event Demonstration
The test administrator will demonstrate proper lifting techniques.
Testing Administrator Tips
Allow a warm up prior to the event. The starting position will have the participant with both hands on the bollard and the command “Start” is given. The participant will apply the force necessary to lift and move the bollard three times continue applying force until the test administrator will say “Stop”.
Equipment
- One item the employee will need to be able lift as part of their job duties.
Agility Run
The third event is the agility run, a measure of coordinated movement and speed. It is an important area for performing tasks requiring quick movements around obstacles.
Please watch this demonstration by the time keeper for this event.
Event Demonstration
Time Keeper will demonstrate course by fast walking the entire course from start to finish.
Start in the prone position to the left of the first cone with the tips of your fingers behind the starting line. When the instructor says, “GO”, stand up and sprint to the forward line (point to line 30 feet away), place one foot over the line, and sprint back to the starting line. Make a left turn around the first cone, then zig-zag in a figure eight fashion around the four cones and zig-zag back to the start line. Turn left around the first cone, and sprint to the forward line and back one more time. The clock stops when any part of your body crosses the finish line. If you knock over a cone, miss a turn, or fail to touch the line when turning, the instructor will stop you and return you to the start line for a restart. Your score is the time it takes to complete the run, and will be recorded to the tenth of a second. You will have two attempts for this event.
The standard for this event is 23.4 seconds. Are there any questions?
Testing Administrator Tips
Allow for a warm up prior to the agility run. The starting position is on the left side of the first cone with participant lying down on their stomach. Start the clock upon the command of “Start”. When the participant is across the finish line the time keeper will stop to clock.
Equipment
- Marked course of 30 feet, with four cones spaced 10 feet apart in a line (Figure 8)
- Stop Watch

Procedural Tasks
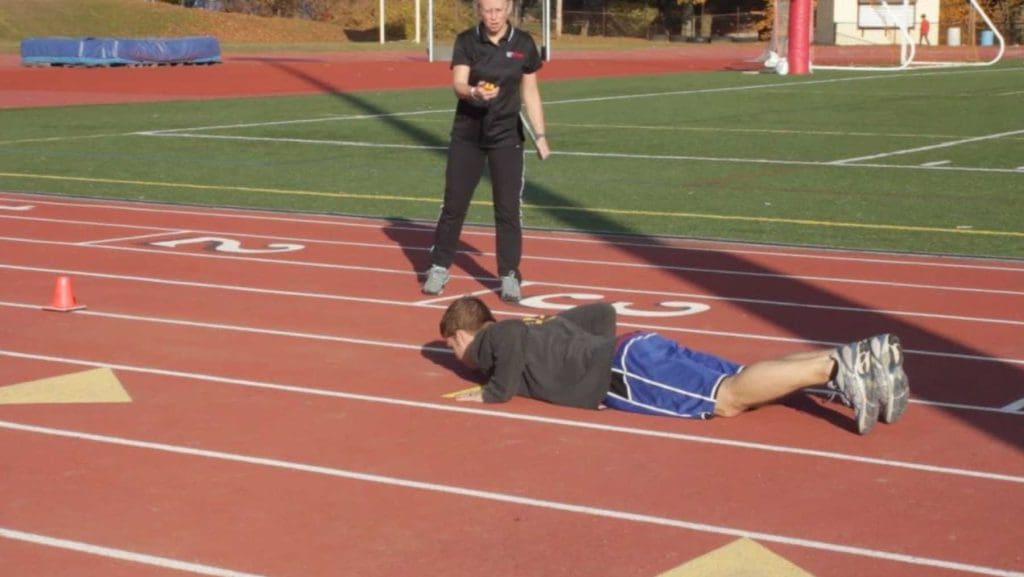
- Participant lies on the ground with fingertips behind the start line. (Figure 9)
- At the “GO” start, participant gets up, sprints straight to the other line (30 feet away) places one foot over the line then sprints back to the start line.
- Participant makes left turn around the first cone then zig zags in a figure eight fashion around the four cones and back to the start line. (Figure 10)
- Participant then sprints up and back as described in (b).
- Record finish time in seconds and tenths.
- Allow one slow walk through and two (2) trials.

Training Dummy Drag / Carry
The fourth event is the Training Dummy Drag / Carry, a measure of the weight that can be moved by the force of your upper body and legs. It is important to use proper lifting and dragging or carrying techniques. Participant will have to properly lift, drag or carry a 145 lb training dummy 25 feet to a location identified by the Testing Coordinator. After the entire training dummies body crossing the 25 foot cone marker, they may drop the training dummy.
There is no time limit for this event. Are there any questions?
Please watch the proper lifting and dragging or carrying techniques demonstrated by the Time Keeper for this event.
Event Demonstration
Time keeper will demonstrate proper lifting and dragging or carrying techniques.
Testing Administrator Tips
Allow a five minute warm up prior to the event. The starting position is, participant has both hands on the training dummy, upon which the command “Start” is given. When the entire training dummies body crossing the 25 foot cone marker, they may drop the training dummy and the time keeper will say “Stop”.
Equipment
- Marked course of two cones 25 feet apart, one cone will be placed at the original starting location of barrier and the other cone will be placed 25 foot away.
- 145lb Training Dummy
Sit-up Test
The fifth event is the two-minute sit up, which measures muscular endurance of the abdominal muscles, an important area for many physical tasks and injury prevention.
Please watch this demonstration by the time keeper for this event.
Event Demonstration
Have Time Keeper demonstrate sit-ups as described in the instructions. During the demo, the Testing Coordinator will point out common errors when performing the sit-up; to include placement of elbows, knees, fingers, heels and buttocks.
Lie on your back, with your knees bent at approximately a 90 degree angle. Your feet may be together or apart, but the heels must stay in contact with the surface. Your partner will hold your ankles. The tips of your fingers must stay behind the ears. When I say “GO,” lift your upper body (head and torso) by bending at the waist, move your elbows to or past your kneecaps. Return to the starting position, with your shoulder blades touching the surface. That will constitute one repetition. If you arch your back, lift your buttocks from the mat, move your fingertips forward of your ears, fail to touch the knees, or fail to touch your shoulders to the mat, you will receive a warning. For any subsequent violation, the repetition will not count. You may rest momentarily in the UP or Down positions during the test but every effort should be made to move continuously throughout the test period. You will have two minutes to complete the prescribed number of sit ups. I will announce “One Minute, One Minute 30, One Minute 45 seconds, and count out the last ten seconds. Your score is the number of proper form sit-ups performed.
The standard for this event is 24 correct sit ups within two minutes. Are there any questions?
Testing Administrator Tips
Coordinators will position themselves at a 45 degree angle to the left front of the participant being tested. From that position you should be able to observe that the elbows touch or extend pass the knees, fingers remain behind the ears, the shoulders touch the mat, the heels remain in contact with the floor, and that the buttocks remain on the mat.
Equipment
- Mat or flat surface.
- Stopwatch
Procedural Tasks
- The participant starts by lying on his/her back, knees bent, and heels flat on the floor. Finger tips stay behind the ears. (Figure 11)
- A partner holds the feet down.
- The participant then performs as many correct sit-ups as possible in two minutes.
- In the up position, the participant must touch or extend past the knees with the elbows, then return the shoulders to the ground before starting the next sit up. The participant may rest in the ‘up’ or ‘down’ position.
- The participant cannot raise the buttocks from the ground and when returning to the down position, the shoulder blades must touch the ground.
- Score is total number of correct sit-ups in two minutes.

300 Meter Run
(984 Feet)
The sixth test is the 300 meter run, a test of anaerobic capacity. This is an important area for performing short intense burst of effort such as in pursuit tasks. The score is the time it takes to complete the course.
(Explain the course/track)
You will start here (point out starting line) and at the command “GO” run as fast as possible to the finish line here (point out finish line). You must complete the run without help.
The standard for this event is 90 seconds or less. Are there any questions?
Please listen to the Time Keeper for the description of the course for this event.
Event Demonstration
Time keeper will describe course and assure the participant understands location of the start and finish lines.
Testing Administrator Tips
Allow a five-minute warm up. Time Keeper will record the time one participant at a time.
Equipment
- Marked course of 300 meters (984 ft.) (Figure 13). For safety and standardization purposes, the course must be measured with a properly functioning distance measuring device such as a wheel. The figure is for use on a standard track. Other testing courses may be used but it is recommended that every effort be made to ensure safety and consistency to include a flat terrain.
- Stopwatch

Procedural Tasks
- Allow five minutes to warm up.
- At “GO” participant runs the 300 meter course as fast as possible.
- Time Keeper records the time it takes to complete the course.
Push-up Test
The seventh event is the push-up, a measure of the muscular endurance of the upper body (chest, shoulders, and triceps). This is an important area for many tasks including use of force, lifting, carrying, and pushing.
Please watch this demonstration by the time keeper for this event.
Event Demonstration
Have Time Keeper demonstrate several correct push-ups as described in the instructions. After demonstration have participant perform a correct push up for the Testing Coordinator to ensure proper technique. During the demo, point out common errors.
Assume the front-leaning rest position by placing your hands on the surface, slightly wider than shoulder width apart, fingers facing forward. The back, buttocks, and legs must be in a generally straight line from the head to the heels. The feet may be together or up to twelve inches apart.
When the instructor says “GO,” lower your body by bending the elbows until the tops of the upper arms, shoulders, and upper back are aligned and parallel to the ground. Return to the starting position by soft-locking your elbows. This constitutes one repetition. You may rest in the DOWN position with their stomach on the ground but every effort should be made to move continuously throughout the test period. You must make every attempt to keep your body straight from your heels to your shoulders and soft lock your elbows. The test will be considered over when the participant returns to a standing position. You will have 5 minutes to complete 18 correct push-ups. Your score is the number of correct push-ups.
The standard for this event is 18 correct push-ups within 5 minutes. Are there any questions?
Testing Administrator Tips
Coordinators should position themselves at a 45 degree angle to the left front of the participant being tested. From that position you should be able to observe that the body remains in a generally straight line, the shoulders are parallel to the ground in the down position, and the elbow locks out upon return the starting position. Time Keeper will record the number of correct push-ups for each participant.
Procedural Tasks
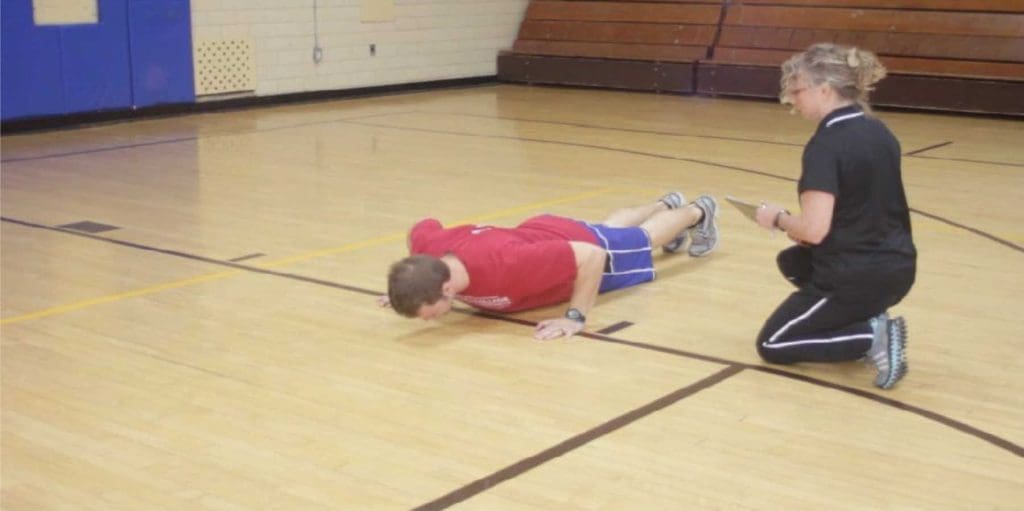
- The participant starts in the front leaning rest position. Hands are slightly more than shoulder width apart; feet are 12″ apart or less (Figure 14)
- The participant lowers self until the upper arms are parallel to the ground, then pushes up again. (Figure 15)
- The back must be kept straight throughout the exercise.
- The score is the correct number of push-ups completed within 5 minutes.

1.5 Mile Run
(7920 Feet)
The eighth and final event is the 1.5 mile run, a measure of cardiovascular endurance or aerobic capacity. This area is important for running pursuits and use of force situations lasting more than two minutes.
You will line up behind the starting line. At the command “GO”, start running. (Explain the course/track) Your goal is to complete the 1.5 miles in as fast a time as you can. As you complete each lap, your time and number of laps to go will be announced. You may walk, but try to keep running for the entire distance.
You may run alongside another runner for help with the pace, but you may not physically assist or be assisted by another runner. After the run do not sit down or stand still but you may walk slowly for a lap.
The standard for this event is 20 minutes or less. Are there any questions?
Please listen to the Time Keeper for the description of the course for this event.
Event Demonstration
Time keeper will describe course and assure the participant understands location of the start and finish lines.
Testing Administrator Tips
Have safety monitors throughout the course. If more than one runner, divide the group evenly and assign numbers to them. If no numbers are available, have each person call out their name as they complete each lap.
Equipment
- Marked level course (See Figure 16) for safety and standardization purposes, the course must be measured with a properly functioning distance measuring device such as wheel. The figure is for use on a standard track. Other testing courses may be used but it is recommended to additional safety personnel to assist in guiding runners and any traffic they may encounter. As always every effort will be made to ensure safety and consistency to include a flat terrain.
- If you have multiple runners, number them so that time keepers will be able to get an accurate time for each individual.
- Orange safety vest if needed for all personnel on course.
- Stop watch
Procedural Tasks
- Have participants warm up.
- Participants should be instructed to cover the distance as fast as possible.
- At the command “GO”, time is started.
- Score is time (min:sec) to run the course.
- A cool down and hydration is required after running.